

While applying for a US visa or green card, your photograph is required. There are numerous requirements to make sure that the photograph is correct. The photograph requirements for the US visa, green card (permanent resident card), diversity visa lottery, and the US passport are essentially the same except prescription glasses are allowed in US passport photos.
US Visa and Green Card Photograph Specifications
- The photo must be in color. Black and white photographs are not accepted.
- The photo must have been taken within the past six months of you submitting the application. It should reflect your current appearance.
- The photo must be taken in front of a white or off-white background.
- Snapshots, magazine photos, low-resolution vending machine or mobile phone photos, or full-length photos are unacceptable.
- Photos copied or digitally scanned from another official document such as a driver’s license or photos are unacceptable.
- Uniforms, clothing that looks like a uniform, and camouflage attire should not be worn in photos except in the case of religious clothing that is worn daily. You should wear normal clothing that you wear on a daily basis in the photo.
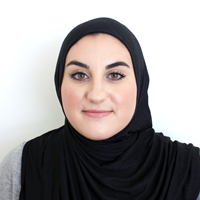
- While getting your photograph taken, you must not wear a hat or head covering that obscures you hair or hairline, unless worn daily for a religious purpose, such as Sikh male’s turban. Your full face must be visible; the head covering must not cast any shadows on your face.
- Photos must not be taken with headphones, wireless hands-free devices, or similar items. However, a hearing device or similar articles may be worn in the photo if you normally wear them.
- The photo must be taken with a full-face view directly facing camera.
- The photo must be a clear shot of your entire face horizontally centered. Profile shots or photos not in focus are unacceptable. Your expression should be neutral with both eyes open. Photos with unusual expressions and squinting are unacceptable.
- Effective November 1, 2016, eyeglasses are not allowed in photo, except in rare circumstances where eyeglasses cannot be removed for medical reasons; e.g., the applicant has recently had ocular surgery and the eyeglasses are necessary to protect the applicant’s eyes. A medical statement signed by a medical professional / health practitioner must be provided in these cases. If the eyeglasses are necessary for medical reasons:
- The frames of the eyeglasses must not cover the eye(s).
- There must not be glare on the eyeglasses obscuring the eye(s).
- There must not be shadows or refraction from the eyeglasses obscuring the eye(s).
- Sunglasses or tinted glasses are not allowed, except in case of applying for a US passport, prescription glasses that have dark on tinted lenses for medical reasons are allowed. However, a medical certificate may be required to verify prescription eyewear.
- Each person must have their own photo. There should be no one else and nothing else in the photo.
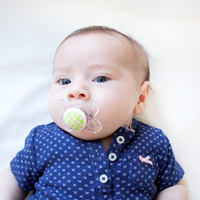
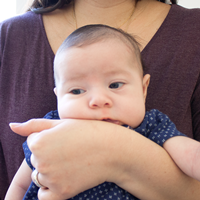
- In case of a child, he/she must be the only person in photo. A child can not be in the arms or hands of a parent holding the child and no other support can be used in the camera’s frame.
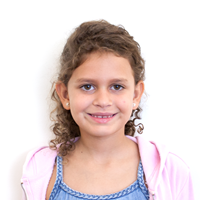
In case of a photo for the baby, you can either lay them flat on their back on top of a plain white or off-white sheet, or cover a car seat with the same. Either approach would ensure that the baby’s head is supported. You need to make sure that there are no shadows on your baby’s face.
Both of the child’s eyes must be open and looking straight ahead towards the camera.
- Photographs must not be digitally enhanced or altered in any way as it could change your appearance. However, you can use the red-eye reduction option in the camera while taking the picture.
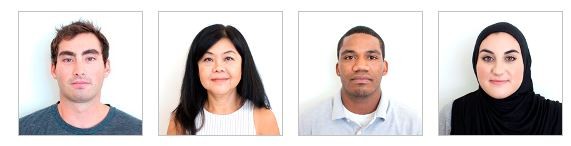
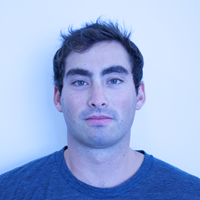
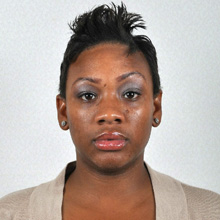
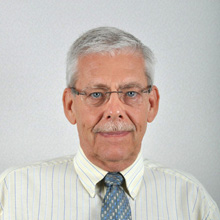
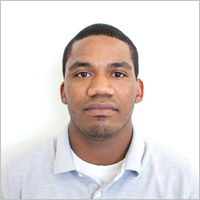
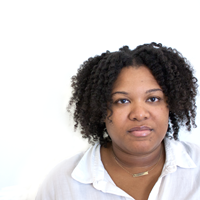
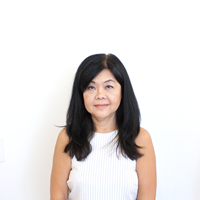
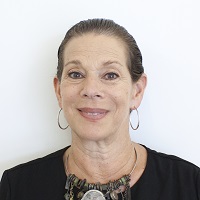
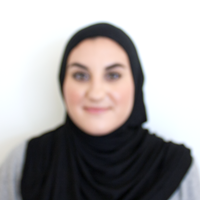
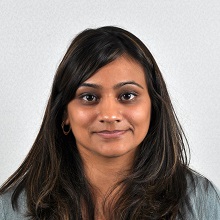
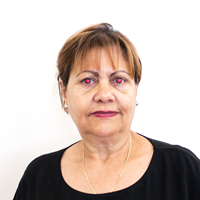
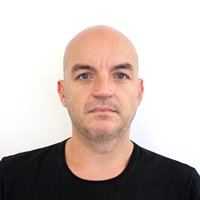
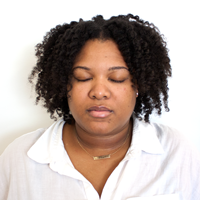
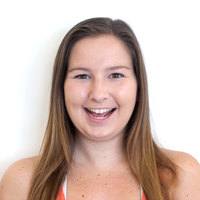
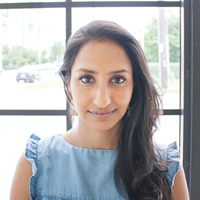
Sample Photographs
Acceptable Visa Photos
Shadows and Lighting

The photo should be clear with no shadows. Be sure that the lighting is adequate to evenly illuminate you and not too bright or too dull so that the photo is overexposed or underexposed.
Glasses

Prescription glasses or sunglasses are not allowed.
Size and Position
Head should be centered and of the correct size.
Resolution, Print Size, and Quality
Resolution should be sharp without any visible pixels or printer dots. Photo should not be blurred, grainy, and should be of the right size.
Digital Alternations and Retouching

The image should not be altered or cropped.
Pose and Expression
Applicant needs to directly face the camera with natural and neutral expression with both eyes clearly being visible. Applicants should not be looking down, up, sideways, laughing, or have their eyes closed.
Attire, Hats, and Hair
A full face should be visible with no shadows or clothing that would obscure the face. There should be no pacifier, scarf, hat, or anything else obscuring the face. Hair should not block the face.
Background
The background must be white or off-white. It should not be any other color than white. There should be no objects in the background and no other person(s), regardless of their age in the photo.
Child
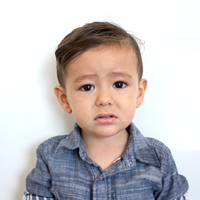
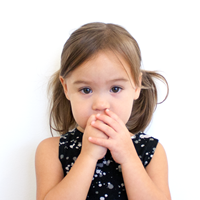
There should be no other person in the photo. The child should be facing the camera with both eyes open. The child should be looking directly at the camera and not be looking around. The child should not have an exaggerated facial expression. Nothing can cover the face such as their hands or pacifier.
Nonimmigrant Visa Photo Requirements
When applying for a non-immigrant visa by completing online forms such as either a Form DS-160 or DS-1648, you will be asked to upload your digital photo. You need to review the digital image requirements, listed above, to make sure it complies in all aspects.
On a DS-160 or DS-1648 application confirmation page, if there is an “X” instead of your photo, that means your photo upload failed. When your photo upload fails, you need to carry one paper photograph with you to the US embassy/ consulate where you will be applying.
In any case, some US embassies and consulates require visa applicants to bring one paper photograph. As this varies, please check with the specific US embassy/consulate where you will be applying.
Immigrant Visa Photo Requirements
Applicants that are applying for an immigrant visa using a Form DS-260 must provide two identical paper photographs at the time of the immigrant visa interview.
Diversity Visa (DV) Program Photo Requirements
When applying for a Diversity Visa (DV) program online, you need to upload your digital photo as part of the application process that meets the following requirements:
- Photo must be in JPEG (.jpg) file format.
- Photo must be square and dimensions should be 600 x 600 pixels.
- File size of the photo must be equal to or less than 240 kilobytes (kB).
In case you would like to scan an existing photo, the paper photo must be 2 x 2 inches and should be scanned at a resolution of 300 pixels per inch (12 pixels per millimeter).
If you are selected for the diversity visa lottery program, you need to bring two identical paper photos to the interview.
Photo Image Requirements
Depending upon whether you are required to submit a paper photo or digital photo, you need to keep different requirements for the image in mind:
Paper Photo
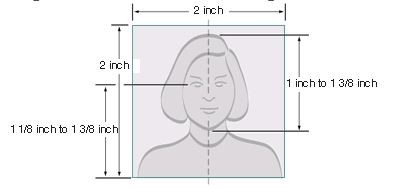
- The photo must be printed on photo quality paper, which can be either matte or glossy photo paper.
- The photo size must be exactly 2 x 2 inches (51 x 51 mm) when printed on paper.
- The head in the photo should between 1 inch and 1 – 3/8 inches (between 25 and 35 mm) from the bottom of your chin to the top of your hair.
- The eye height is between 1 1/8 inches to 1 3/8 (28 mm – 35 mm) from the bottom of the photo.
Digital Photo
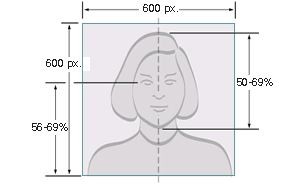
- Your head should be between 50% and 69% of the image’s total height from the top of the head, including the hair, to the bottom of the chin.
- The image must be square with the minimum dimensions being 600 x 600 pixels and the maximum dimensions being 1200 x 1200 pixels.
- Image size must be less than or equal to 240 kilobytes (kB). In order to meet the maximum size requirement, if the image needs to be compressed, the compression ration should be less than or equal to 20:1
- Image must be in JPEG (.jpg) file format
- Image must be a color image in sRGB color space, which the most common format for most digital cameras.
Where to get photographs taken
As there are many requirements and it is hard to meet all of the requirements by yourself, it is the best to use a professional photo service.
In the US, you can visit many places like FedEx Office, Walgreens, CVS. You can also visit a private photo studio of your choice.
Even though you might be tempted to save some money by taking the picture yourself, you may not want to risk your entire visa or green card application being rejected or delayed where you could incur significantly more expenses and/or hardships.

New Immigrants Insurance
Get QuotesFor visitors, travel, student and other international travel medical insurance.
Visit insubuy.com or call +1 (866) INSUBUY or +1 (972) 985-4400Appearance Change
Even if your photo was taken within the last 6 months, if your appearance has significantly changed from what is in the photo, you would need to get a new photo taken. Simply growing a beard or coloring your hair is not considered a significant change. As long as you can be identified from the photo, a new photo is not required. Children and teenagers that go through the normal process of growing do not need a new photo. However, if you have undergone significant facial surgery or trauma, added or removed numerous\large facial piercings or tattoos, undergone a significant amount of weight loss or gain, or obtained a new gender identity, that is considered a significant appearance change and a new photo is required.
In any case, it will be at the discretion of the US Embassy/Consulate or USCIS whether to accept your photo or not.
