If you have lost or are unable to retrieve your DS-160 confirmation page that has already been submitted, it’s no problem. This this article will help you retrieve it again.
To reprint the DS-160 confirmation page of an application that has already been submitted, follow the below steps:
- Click here to visit the U.S. Department of State Consular Electronic Application Centers website.
- Under NONIMMIGRANT section, choose DS160, Online Nonimmigrant Visa Application.
- Select the location where you had made the appointment (check your appointment confirmation) e.g. India, New Delhi.
- Enter the captcha code and click the “Retrieve an Application” button.
- If the captcha code is correct, it will now ask you to enter the DS-160 Application ID, which can be found in the appointment confirmation page as “DS-160 Confirmation Number” and click “Retrieve Application” button.
- “Retrieve Application” is used to fetch the already submitted DS-160 confirmation page.
- You will then be prompted with additional security questions:
- First 5 letters of surname.
- Year of birth.
- What name did your family used to call you when you were a child? (this could be different).
- Once you have entered the correct answers and click the “Retrieve Application” button, you will be prompted with:
- “View Confirmation Page” (select this option).
- “Create New Application”.
- Select “View Confirmation Page” option and “Continue.”
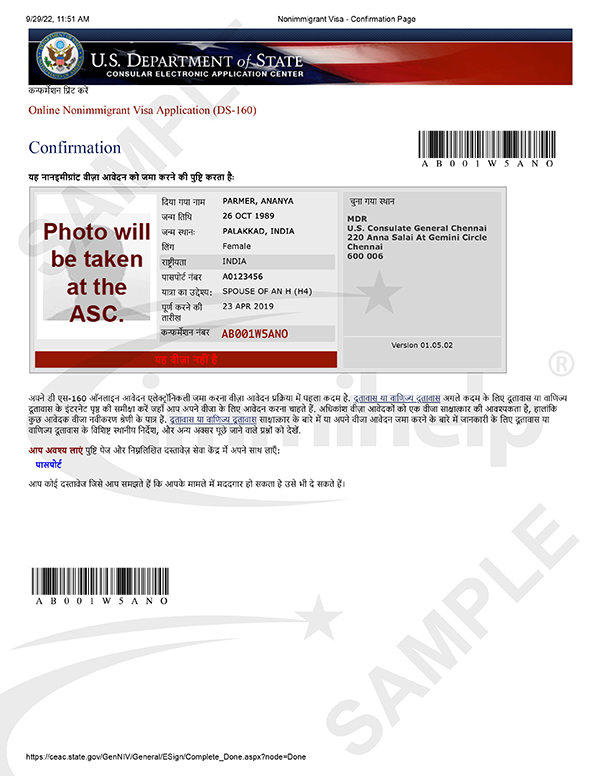
- The confirmation page will consist of a barcode, application ID and your name and details.
- Select “Email Confirmation” and select “yes” if you need to send to a different email address. (Do you want to send your confirmation to an additional email address?)
- Enter and confirm if you chose a different email. Otherwise, just click the “Email Confirmation” button.
- Wait for the email to arrive at your chosen email address. It sometimes take 5-10 minutes.
- Just to be on the safe side, click “Print Confirmation” and “Save as PDF” in your local machine.
- Also, make sure the “Completed Date” (पूर्ण करने की तारीख) is the date of which you filled the DS 160. If you are trying to retrieve the confirmation page after 30 days it might not show up. Instead it might pull up the previous ones and that might be dated way back.
- In such case, repeat the steps from the beginning and click Create New Application at step 8. Make sure to save the Application ID somewhere in your notepad or email it to yourself just in case if you loose the session you don’t want to redo all the steps again and again.
Did you ever wonder what a DS-160 confirmation page look like? Please check the below.